Electric Fence Installation Guide
Building a fence requires a combination of quality materials, use of proper construction techniques, and some elbow grease. No two fencing jobs will be the same. We will discuss the basic steps to successfully construct a fence, including:
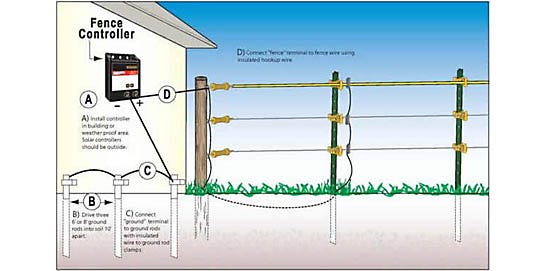
Fence Charger Installation
The electric fence charger should be installed in a clean, sheltered location away from direct moisture and sunlight (with the exception of solar powered chargers). It should be accessible to a separate ground rod system from a home or barn.
If the consumer using an AC charger, the location should be as close to the power source and the electric fence as possible. Even though the charger's enclosure is basically weatherproof, it is advisable to install it indoors or in weatherproof housing.
Be sure to install porcelain tube-type insulators (or equivalent) in the walls of buildings or housings where the fence wires feed through. Frequently inspect the area where the charger is installed and maintain it as a clean and dry environment.
NOTE: Never allow the fence wires to come into contact with objects which may cause the electric "charge" to ground.
Installation and Location
Every fence charger comes with a detailed installation manual. In addition, individual components include “how-to” instructions to assist in the fence system assembly.
A fence charger should be:
- Sheltered from the weather (except solar chargers). Place indoors to protect from moisture or outdoors in a protective enclosure.
- Close to 110-volt AC power source (unless battery or solar powered).
- Accessible to a ground rod system that is separate from building or grounding rods used by other systems or buildings.
Mount the fence charger off the ground using a screw or nail through the hanger hole in the charger case. Connect the ground wire to the ground terminal and ground rods using insulated ground wire. Connect the fence terminal to the fence wire using 20,000-volt (or higher) hook up wire.
Proper Voltage
A fence tester, also known as a voltage tester, voltage meter, or voltmeter, can help determine if there is adequate voltage on the fence line. Voltage testers are also useful in troubleshooting bad grounds and fence shorts.
Be sure to purchase a voltage tester designed specifically for electric fence. Fence testers contain special circuitry which allows the device to withstand and respond to very high voltages which are on for only a few millionths of a second. Standard voltage meters used for household electrical purposes are not capable of this and will not work with electric fences.
In addition, it's important to note that voltage testers designed to read direct current (DC-output) pulses will not work with alternating current (AC-output) fence chargers. In general most fence testers can be used with both high and low-impedance fence systems.
Zareba® offers a variety of fence testers to help keep a fence system working properly. Some designs come with testing probes, while others have the probe built into the main body of the device. The simplest models feature a light, which when lit, indicates electrical current is flowing through the fence. However, these simple designs are not adequate for troubleshooting ground or short issues. More complex models known as "fault finders" display voltage in kilovolts (kv) and amps of current.
Troubleshooting With a Voltage Tester
If a short in the fence is suspected, a "fault finder" fence tester with a display showing voltage (kv) and current readings (amps), as well as arrows pointing in the direction of the fault, is the best tool to locate the problem.
Shorts are caused by a number of things such as broken wires touching the ground, weeds, and cracked insulators. All of these will cause the wire to short out and ground. Underground wires going under gates which were not protected properly can also cause electric fences to ground out.
Ideally, the fence should be running a high voltage (kv) and little to no amps. A reading with high amps indicates a short. The higher the amps reading the worse the short.
An example:
The consumer has a single-wire fence that usually runs 6,000 volts or 6 kv.
One day the user tests the fence and the reading is 2000 volts or 2 kv and 20 amps.
Start by testing the fence charger first to make sure it is not the problem. Once the fence charger is ruled out, start testing near the beginning of the fence run. Continue down the fence line following the "fault arrows" on the fence tester display until the short is found.
If there is a spot where the fault arrow begins to point in the opposite direction or get a no reading (e.g. 0 amps, barely any kv), the user will need to back track between where they tested and the previous test spot.
Having a fence tester on hand will make finding shorts and other issues quick and easy, saving time and money in the long run.
Lightning and Power Surge Protection
Lightning is often the cause of fence charger failure. When lightning strikes the fence, the sudden power surge can travel down the fence wire and damage the fence charger.
A variety of properly installed products can prevent or limit lightning damage.
- To prolong the life of a fence charger, consider disconnecting the fence charger from the power source when storms are near.
- Install a lightning diverter/arrestor to divert lightning to the earth before it can damage the charger. For the greatest protection, install one lightning diverter/arrestor at each corner of the fence, but no closer than 50 feet to the fence charger.
- Use a lightning choke between the fence line and fence charger to dissipate power surges caused by lightning.
- Use an AC surge suppressor to protect against AC power surges.
Recharging an Energizer's Battery
A trickle charger should be used to maintain a solar fence battery when the fence controller is not in use for more than three months. The battery should be stored outside of the energizer. When the battery is removed from the fence controller, it should be charged for no longer than 18 hours, stored at a moderate temperature and placed on a wooden board keeping it off the ground.
Before the battery is reinstalled into the fencer for use, it should be recharged for an additional 18 hours to ensure it is fully charged for operation.
Ground Rod Installation
The grounding circuit is a critical component of the electric fence and is essential to its proper functioning. The fence charger, or energizer, is designed to alter the electric charge into a power that is safe for animals and people.
When an animal touches the electrically charged fence wire, the animal feels the electric current as the charge passes through its body. The charge then continues the circuit through the earth to the ground rod and then up the ground wire to the ground terminal of the charger.
If the animal and the ground terminal of the charger are not sufficiently grounded, the path of electric current cannot be completed and the animal will not feel the shock. Since earth provides half of the electric field circuit, it is crucial to have a properly installed ground circuit.
Birds landing on the wire will not be harmed -- since they are not in contact with the ground as they sit upon the wire, they are not completing the circuit, and therefore they will not receive a shock.
90% of electric fence problems can be traced back to the fence being improperly grounded.
Grounding Tips
Follow the instructions for grounding in the fence charger owner's manual; they will be a guide through the process. One terminal of the charger will connect to the fence while the other terminal will connect to earth ground wire.
Sandy, dry, and rocky soils may require a "one-wire" ground-wire return system or, in some cases, a "two-wire system." More is explained about the differences between these two systems in the next section. Make sure to have connected the grounding rod properly. It must go to the ground terminal on the charger. Do not make the mistake of connecting it to the fence wire or fence terminal.
Longer fences or areas where the soil is dry, rocky, or sandy may require more grounding rods. Multiple rods should be placed at least 10 feet apart and at least 50 feet from any other grounding system. Each rod will then need to be connected using insulated wire.
Grounding rods may be copper or galvanized. The benefit of copper is that it transports the electrical charge more efficiently than the galvanized rod; however, it is more expensive than a galvanized rod. For ease of installation, pour water into the entry point when pounding in the ground rods.
One Wire System
When only charged wires run the perimeter of the fence, this is called a one wire system. If there is a small area, with one or two strands of wire, a one wire system is what should be used.
One wire systems can also be used when adding on to an existing fence. Running a charged strand of wire on the top of a non-electrified fence will keep livestock from reaching over the fence and damaging it. This method can be used on barbed or woven wire fence as well.
Two Wire System
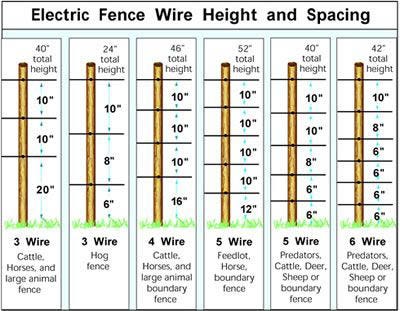
A two wire ground system should be used if there are more than three strands of wire on the fence. The two strand system allows the animal to complete the circuit by touching a charged wire and a ground wire at the same time. The strands on the fence must alternate between a ground wire and a charged wire: one charged, one ground, and then charged, etc.
If there is a large area that needs to be fenced in, this system is ideal. It is also great to contain animals with long hair, or wool, and areas with sandy or rocky soil. Grounding this system is simple. The wire from the ground terminal will connect directly to the ground rods and then connect to the ground wires on the fence line. The charged wires are connected to the terminal on the charger.
Fence Post Installation
IMPORTANT: Check with the local gas company and other utilities before digging! Buried gas lines, electrical lines and water lines can result in serious injury or death if they are punctured or come in contact with live wires.
Fence post selection will depend on the animal being controlled, topography, price, fence type (portable, temporary, or permanent), and the expected lifetime of the fence.
Recommended Post Spacing:
| Fencing parameters | Spacing (feet) |
|---|---|
| Woven Wire | 14-16 |
| Barbed Wire | 12-14 |
| Electric | 12-20 |
| High-tensile, level terrain | 30-90 |
| High-tensile, difficult animals, rolling terrain | 15-20 |
| Poly tape and poly wire | 12 |
| Board | 8 |
| Corrals | 6 |

Use wood posts at corners and ends due to the extra strain at these locations. Whether the fence is designed to contain livestock or to repel predators, these wood posts should have at least a 6 inch diameter. One end of the wood posts should be placed 3 to 4 feet into the ground.
The corner posts take tremendous tension loads and are the key to a solidly constructed electric fence. Long runs of multiple-wired fences also need brace posts along the fence line. Line posts need only support the wire between the corner posts.
Don’t worry about spacing posts evenly other than for appearance. On level terrain they can be further apart; on uneven terrain, posts need to be spaced wherever there is a high or low spot.
On hillsides, posts should be installed perpendicular to the slope. This keeps the wire at the proper height and spacing and prevents it from binding on insulators or clips.
If using wood or steel fence posts, make sure the fence wires cannot touch the posts.
Place brace posts along the fence line when there are multiple wires running a long distance. Bracing the corners and fence line will help dramatically increase the strength of the fence.
Step 1: Choosing the fence line
Before installing posts, choose the fence lines. Most of this will already have been completed in the planning and designing phases, however, here are a few tips to help make choosing the fence line easier.
- Check property lines and arrange cross-fences to take maximum advantage of the area being fenced.
- Avoid fencing in rough, stony, broken, or steep areas if possible.
- If putting in high tensile fencing, consider zig-zagging the fence line slightly rather than going straight over areas that need leveling, more posts, etc.
- If necessary, level uneven areas before setting posts. Where the ground is leveled, re-plant grass to prevent erosion and weed growth.
Step 2: Setting corner, end, and line brace assemblies
Corner and end posts, along with line brace assemblies, are the backbone of the fencing system. Fences such as high-tensile put an enormous amount of tension on these assemblies, and therefore need to be strong enough to handle the force. To do this, it is imperative to do things right the first time and set posts deep.
Step-in, pigtail, rebar, and fiberglass posts, along with t-posts are not recommended for corner posts. Although they are cheaper than wood posts, they cannot hold up to the strain and tension like a wood post. Wood posts should be used at corners, gates and termination points of a fence. Rebar and fiberglass posts can be used along the fence line.
Important things to remember when setting corner, end, and line brace assemblies:
- Corner posts require a brace assembly for each fence leading to it.
- With fences more than 200+ feet, it is best to use a double span assembly.
- Set corner posts leaning back from the direction of the fence approximately five degrees.
- Brace wire should pull in the opposite direction than the fence is pulling.
- When spans between posts exceed 650 feet use braced line post assemblies every 650 feet of the fence line. (Note: Brace line assembly is the same as a single span braced corner, but uses a second diagonal brace wire to pull the fence in the opposite direction.)
- If adequate post bracing cannot be achieved, additional bracing will be required to maintain tension.
Step 3: Setting fence posts
How the fence posts are set will depend on the type of posts chosen. Step-in and pigtail posts are easily set by stepping-in or pushing the base of the post into the ground. Rebar / fiberglass must be driven into the ground with a hammer.
T-posts are most effectively set by using special tool known as a t-post pounder. Some people use a large hammer, but this is challenging and not recommended. Purchase a "post pounder" from the same source where the electric fence supplies are purchased. A heavy pipe with a closed end can also work.
Wooden posts, which will make up end, corner, and brace posts, can be driven into the ground with a post pounder or tamped into place.
To set wooden fence posts, mark the digging tool to the desired depth fence posts will be set. This will ensure uniform depth. Drive the post into the ground manually or with a tractor-mounted driver.
In sandy or rocky soil the fence posts need to be set deeper than in clay or dirt. Also, the amount of tension on the wire at the corner will determine the depth as well. Another factor is if the corner posts have brace posts to support them. A depth of 3-4 feet will usually work.
An additional method to set wooden posts is to dig a hole larger than the post diameter. Place the post in the hole and then repack the soil around it. Make sure to center the post before tamping. This will make tamping easier and allows soil to pack tighter around the post. Continue to replace small amounts of soil and tamp. Be sure to plumb the post to make sure it is level.
The distance between line posts will depend on the terrain of the area being fenced. On very flat land, line posts are commonly spaced 10 to 16 feet apart (if not electrified). If electrified, spacing can be as far as 150 feet apart for line posts. Wire spacers are used in all dips and at least every 30 feet apart for five wire strands and 50 feet for two to three strands. Move line posts closer together as the terrain becomes hillier.
Fence Wire Installation
Running Wire
Wire will come packaged in various size coils or rolls depending on the type of fencing chosen. The height, spacing, and number of the wires necessary will vary with the animal being contained and purpose of the fence. Wires can be run from the coil or roll using a payout spinner or, if running multiple strands, a multi-wire fencer.
To get started, walk from the far corner post to the first one, making sure wires are in a straight line. This will be an easy job if the fence is on flat land. On rolling terrain, there may be a need to straighten the wire by lifting and letting it drop on its own until it falls onto the same position. Getting the first wire straight is very important. If there is trouble with this, try driving two pegs or sighting posts into the ground where each can be seen at the same time as the corner posts. Sight over the guide posts and move them until they line up with the end posts.
The bottom wire will be run out first and tensioned slightly to act as a guide for setting line posts. Crimping sleeves and/or appropriate knots are used to secure wires to corner, end, and gate posts. As each line post is set, secure the bottom wire to each post. This will allow a better determination of the next post's position. Wire should be strung on the inside of line posts and on the outside of curves.
Electrified wire will require insulators for fastening to posts. For non-electrified wire, staple or clips will suffice. If driving staples into wood posts, do so slightly off the vertical so they straddle the wood grain. To drive a staple rotate it 25 degrees from the flat surface of the point. This spreads the legs of the staple, increasing holding power. Drive staples at upward angles for downhill grades and downward angles for uphill grades. Be sure not to drive too deeply as the wire must still be able to slide through the staples for adjusting tension.
Note: The required wire spacing will vary with type of wire used and species / class of animal(s) being contained or excluded. See the Animal Selector section for recommendations by animal.
Tensioning Wire
The amount of weight needed to tension wire will depend on the type of wire chosen. High-tensile wire is typically tensioned to approximately 200-250 pounds. Be sure to not apply too much tension to wires. Excessive tension will damage wire and may lift fence posts out of the ground in low spots.
Ratchet in-line strainer or tightener to tension wires. Ratchets will also allow wire tension to be adjusted for temperature changes. Use a tension indicator spring to adjust each wire to the proper tension. Next, tighten the rest of the wires by feel to match the tension on the wire with the spring.
For short stretches of fence line (less than 600 feet), the in-line strainer and tension indicator spring, known as the friction center, can be placed anywhere, but usually should be close to an end. On long, fairly straight runs, it is more ideal to place them in the middle so that tension is dispersed equally to both sides of the fence. Long runs with both straight and curving sections should have the friction center placed in the bends section rather than the straight section.
NOTE: Wear heavy gloves and eye protection when tensioning wire to protect from possible injury.
Things to Consider with Electric Fence Wire

Wire Gauge
Smaller gauge numbers on wire indicate larger diameters; conversely higher gauge numbers accompany thinner fence wire. Most electric fence wires are 14 to 17 gauges and are steel or aluminum. High-tensile is most often 12.5 gauge galvanized steel and will state that it is for high-tensile systems.
Note: Fence wire that is 12.5 gauge or larger is not considered high-tensile